· Michele Mazzucco · 10 min read
Virtual queues from scratch, Part 1: concepts and architecture
Kick‑start your journey into building lightning‑fast virtual queues: master the key queuing concepts and set up a lean, low‑latency architecture.

In our previous articles How to choose the right virtual waiting room and the recently published follow-up, we have explored how virtual waiting rooms help businesses handle traffic spikes gracefully, ensuring service stability and fairness for users. After those publications, many of our readers asked an interesting question:
Can we build a basic virtual waiting room ourselves, without relying on commercial vendors?
The answer is yes—and in this article series, we are offering a practical, step-by-step guide to building a simple, effective virtual waiting room using common tools like Docker, Redis and Python. We will call it the “Poor Man’s Guide” to highlight its simplicity and affordability.
We will walk through:
- Understanding essential concepts (queue management, arrival rates, and service rates)
- Choosing a core architecture by comparing the Push vs. Pull models.
- Identifying common implementation pitfalls to avoid.
- Selecting a foundational technology stack and justifying those choices.
By the end, you will have a working proof-of-concept (POC) of a virtual waiting room, demonstrating key concepts and functionality clearly.
While suitable for educational purposes and experimentation, please note that this implementation is not production-ready. Important considerations such as security, reliability, scalability, and user-friendly web interfaces have been intentionally simplified or omitted. However, this POC provides a solid foundation and clear insights into building a virtual waiting room without vendor lock-in or significant financial investment.
📌 Why Python for this proof-of-concept?
Let’s get started!
Table of contents
Part A – The “Why”: conceptual foundations
Queues are not a necessary evil; they are a design decision.
At scale, every popular digital service eventually needs to decide how it will make people wait. This article is Part A of our hands-on series, covering the essential “Why” of virtual queues. We will establish the core concepts and make the foundational architectural decisions before diving into code in the articles that follow.
1. Why virtual queues?
“Just auto‑scale!” is the usual reaction when capacity is short.
In reality, most back‑ends have hard saturation points—database connection limits, third‑party rate caps, or CPU‑bound algorithms.
Virtual queues (also known as virtual lobbies or virtual waiting rooms) create a deliberate buffer between unbounded demand and finite supply, smoothing spikes while keeping the user experience predictable.
Key benefits include:
| Benefit | Impact |
|---|---|
| ☂️ Protect back‑end | Prevents meltdown under traffic bursts |
| 🤝 Fairness | First‑come‑first‑served or priority tiers |
| 👓 UX transparency | Show accurate wait times instead of cryptic errors |
| 📈 Analytics | Precise metrics on demand vs capacity |
2. Essential queuing concepts
Before diving into the code, let’s briefly cover a few key concepts:
- Queue management: At its core, a virtual waiting room is simply a queue where requests wait until it’s their turn. Efficient queue management ensures fairness (first-come, first-served) and stability under high load.
- Arrival rates (λ): The average rate at which users enter the system, typically measured in requests per second. Understanding arrival rates helps you scale your system to handle varying traffic levels.
- Service rates (μ): How quickly the system can handle requests, typically measured as the average number of requests processed per second by each worker or server.
- Utilization (ρ), ρ = λ / (c × μ): The ratio of arrival rate to total service capacity. It determines how busy the system is and directly influences waiting times and queue lengths.
- Squared coefficient of variation (SCV): measures burstiness. High SCV results in longer queues.
A key concept for the rest of this series—in practice, you will see two kinds of waiting time:
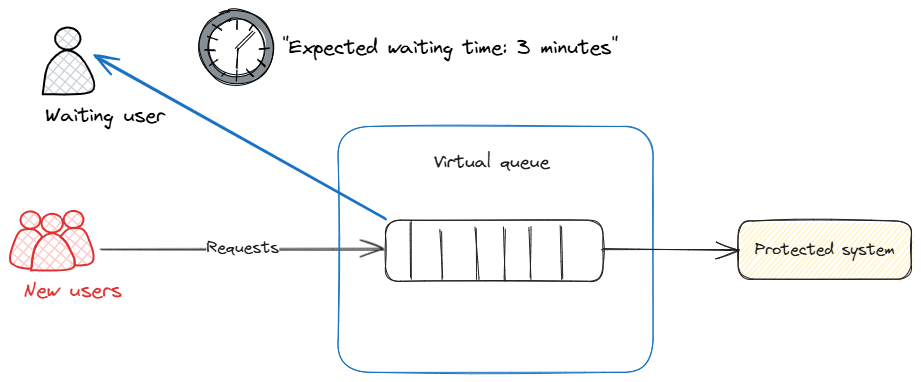
- User-facing ETA: For users already in the queue, we estimate how long until it’s their turn—based on their position and how fast we are moving. This keeps users informed and reduces frustration.
- Admission control wait: For new arrivals, we estimate how long they would have to wait if we let them in right now—using a simple, robust formula (current queue backlog divided by throughput). We use this estimate to decide whether to admit or temporarily reject new requests, keeping the system healthy.
This separation is crucial: user transparency and system protection require different trade-offs.
💡 Why not fancy queue formulas?
3. The core architectural choice: Push vs. Pull model
Before diving into the implementation, it is essential to understand the fundamental architectural choice of this POC: a pull-based dispatch model. This choice dictates how the system adapts to load and is a prerequisite for advanced abandonment handling.
There are two primary models for moving users from a waiting room queue to a backend application:
- Push (rate-based): A central dispatcher sends a pre-determined number of users (X per minute) to the backend.
- Pull (capacity-based): Backend servers actively “pull” the next user from the queue only when they have free capacity.
This POC implements the Pull model for its superior resilience and efficiency in modern cloud environments.
3.1. The Push model (rate-based)
In a Push model, the lobby service acts as a gate, releasing users at a pre-configured, constant rate. This approach is valued for its predictability and simplicity.
Pros:
- Simplicity: The logic is straightforward to implement and understand.
- Predictable egress: Provides a constant, easily communicated rate (e.g., “500 users will be admitted per minute”).
Cons:
- Less adaptive to dynamic capacity: This model’s primary challenge is its fixed nature in a dynamic environment.
- If backend capacity degrades (due to faults or high resource usage), the constant push rate can overload the system, causing errors.
- If backend capacity increases (due to auto-scaling), the fixed rate can lead to under-utilization of available resources, prolonging the queue unnecessarily.
- Lacks direct feedback loop: The dispatcher operates independently of the real-time state of the backend workers. This makes it challenging to adjust the ingress rate based on factors like how many active slots are being consumed by abandoned sessions, or by requests consuming an extremely long (or short) amount of time to be served.
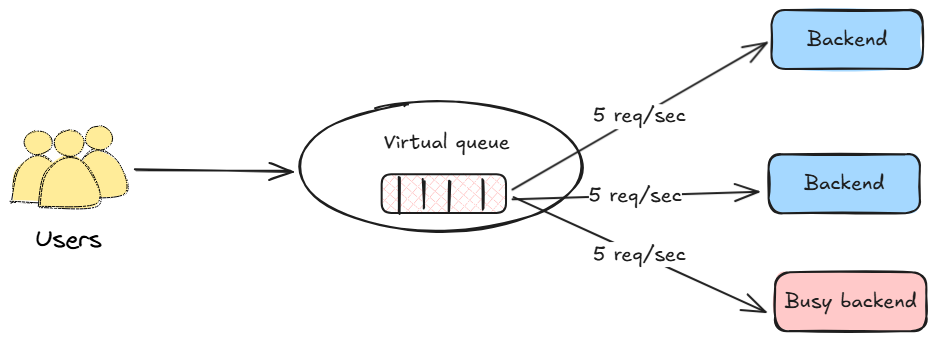
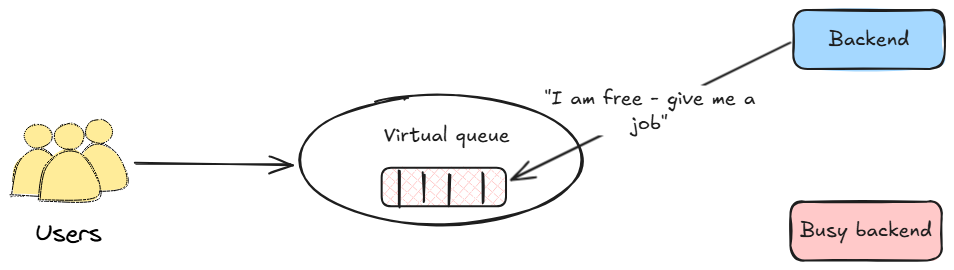
3.2. The Pull model (capacity-based)
In a Pull model, the paradigm is inverted. The backend servers drive the flow. This is a form of a CONWIP (Constant Work-In-Process) system. As soon as a worker finishes a request, it signals its availability and “pulls” the next user from the queue. This adaptive approach is a foundational principle for many large-scale, modern systems.
Pros:
- Resilient and adaptive: The system naturally adjusts to the backend’s real-time capacity. If a server fails, it simply stops pulling requests. If new servers are added via auto-scaling, they immediately start pulling, increasing throughput. It is inherently difficult to overload the backend with this model.
- Maximizes efficiency: Ensures that backend servers are consistently utilized, shortening the queue as fast as currently possible.
- Enables smart abandonment handling: Because the backend worker “owns” the request from start to finish, it can be instrumented with the cancellation logic discussed later. A pull model is the foundation for effectively handling in-flight abandonment.
Cons:
- Slightly higher complexity: Requires a communication channel for the backend to signal its availability and request new users from the queue.
3.3. Rationale for this POC
For modern applications with dynamic, cloud-native infrastructure, the Pull model offers compelling advantages. Its ability to gracefully handle fluctuations in server capacity and to serve as a foundation for intelligent abandonment handling makes it a highly resilient and efficient architectural choice.
4. Common pitfalls
Designing virtual queues looks trivial—until real traffic shows up. Five failure modes appear in almost every first‑generation implementation:
- Tail‑latency blind spots – Engineering to hit a 100‑ms average but ignoring the 2‑second p99 that melts user trust under heavy load (ρ approaching 1).
- Queue overflow and back‑pressure collapse – Letting the queue grow unbounded eventually swaps or crashes servers. Always cap the maximum queue size and enforce TTL.
- Abandoned tickets – Tabs close, mobiles lose signal; stale entries skew occupancy unless actively pruned or auto‑expire.
- Uneven capacity signals – CPU pauses (GC, JIT, network blips) make μ bursty under heavy load; strategies such as token‑bucket or leaky‑bucket protect the queue.
- State duplication – Storing tickets in multiple stores introduces race conditions; keep a single source of truth.
We will tackle these head‑on throughout the series.
5. Technology choices at a glance
| Layer | Tooling | Rationale |
|---|---|---|
| Fail safe | OpenResty | Fail safe rejection scheme at the edge via Lua script for exceptional scenarios—the digital equivalent of locking the front door when the building is full |
| Lobby API | Custom ultra‑lean ASGI server (Python 3.12, uvloop) | Minimal allocations, higher throughput, reduced latency |
| Serialization | msgspec.Struct | 5–8 % CPU drop vs Pydantic on the same workload, lower latency |
| Queue state | Redis 8 | Atomic operations via Lua scripts + expiry makes pruning trivial |
| Metrics | Victoria Metrics + Grafana | Standard stack for time‑series |
| Load testing | Rust‑based generator (tokio runtime) | No GIL, microsecond timers, 100k req/sec on laptop |
🔎 Why not FastAPI / Flask / Starlette?
Coming up in Part B: Building the Core Service
In the next article in this series, we will move from design to code and begin the implementation. We will focus on bootstrapping the lean Lobby API service from scratch, covering how to:
- Set up the custom, high-performance ASGI server.
- Define the core API endpoints (
/join,/position). - Establish the initial connection with Redis to manage basic state.
- Once this foundation is in place, subsequent articles will build upon it to add the liveness system, backend protection, and performance calibration.
📬 Get weekly queue insights
Not ready to talk? Stay in the loop with our weekly newsletter — The Queue Report, covering intelligent queue management, digital flow, and operational optimization.